Rupes Bearing & Spindle Assembly


Rupes Bearing & Spindle Assembly

Rupes Bearing & Spindle Assembly

Rupes Bearing & Spindle Assembly
<br/>56.245S/C | Rupes Eccentric Bearing Stack Assembly.<br/><br/><br/>56.245S/C | Rupes Eccentric Bearing Stack Assembly.<br/><br/><br/>56.245S/C | Rupes Eccentric Bearing Stack Assembly.<br/>Install Tips for Rupes Replacement Parts 560.197/C and 56.245S/C.<br/><br/>Although this assembly can handle a tremendous amount of stress, occasionally a bearing becomes damaged, or wears out. A broken or cracked bearing race can diminish random rotation of the backing plate, or cause the backing plate to wobble, or not spin true. In extreme cases, the bearing can completely lock up.<br/><br/><br/>56.245S/C | Rupes Eccentric Bearing Stack Assembly.<br/>Install Tips for Rupes Replacement Parts 560.197/C and 56.245S/C.<br/><br/> To test the bearings: With the machine turned off, rotate the backing plate by hand. If there are any apparent crunching or clicking noises, or the plate seems to wobble, or it struggles to spin freely & smoothly, then there is a high likelihood that a bearing has gone bad. Usually, it is the bottom, hidden-away bearing.<br/><br/><br/>56.245S/C | Rupes Eccentric Bearing Stack Assembly.<br/>Install Tips for Rupes Replacement Parts 560.197/C and 56.245S/C.<br/><br/>While it is recommended to have this assembly swapped out by a repair center or machine shop, there are a multitude of ways to go about replacing the assembly in a home garage setting.<br/><br/>Depending upon the procedure, some of the following tools will be needed:<br/><br/>• Heat gun or blow dryer<br/>• Tool or penetrating oil<br/>• Hammer and pin punch<br/>• #2 Philips® Head Screwdriver<br/>• Various diameter sockets<br/>• Bench vise<br/>• Adjustable or locking pliers<br/>• Masking tape<br/>• Threadlocker<br/><br/>To remove the bearing assembly when a specialized press or puller is not available, click the remaining images for some recommendations.<br/><br/><br/>56.245S/C | Rupes Eccentric Bearing Stack Assembly.<br/>Install Tips for Rupes Replacement Parts 560.197/C and 56.245S/C.<br/><br/>To remove the counterweight from the hub, place the assembly into the jaws of a bench vise, or grasp the hub with adjustable or locking pliers.<br/><br/>Warm the screws and counterweight using a blow dryer, or heat gun. Apply tool or penetrating oil onto the screws, enough so that the oil can seep into the threads of the screws and soften the hardened threadlocker. Remove the screws using a #2 Philips® Screwdriver.<br/><br/><br/>56.245S/C | Rupes Eccentric Bearing Stack Assembly.<br/>Install Tips for Rupes Replacement Parts 560.197/C and 56.245S/C.<br/><br/>One way to remove the damaged bearing assembly without a puller is to knock it out of the hub using a pin punch.<br/><br/>To support the hub, place it atop the jaws of a bench vise, with its jaws adjusted so that the hub itself is supported, but the bearing is free to slide out of the hub, and between the jaws.<br/><br/>Drip an abundance of oil into the threaded hole of the hub. Heat the hub assembly.<br/><br/><br/>56.245S/C | Rupes Eccentric Bearing Stack Assembly.<br/>Install Tips for Rupes Replacement Parts 560.197/C and 56.245S/C.<br/><br/>Place the punch into the threaded hole. Position the punch against the spindle, and tap it with a hammer until the assembly falls out.<br/><br/>If the punch inadvertently strikes the bearing, it should be of no concern, as it is very likely already damaged.<br/><br/><br/>56.245S/C | Rupes Eccentric Bearing Stack Assembly.<br/>Install Tips for Rupes Replacement Parts 560.197/C and 56.245S/C.<br/><br/>This is what the bearing assembly looks like as it is being knocked out of the hub. A few more taps of the hammer should remove the assembly with ease.<br/><br/><br/>56.245S/C | Rupes Eccentric Bearing Stack Assembly.<br/>Install Tips for Rupes Replacement Parts 560.197/C and 56.245S/C.<br/><br/>Once the bearing assembly has been removed, visually inspect it to identify any damage. If the spindle remains intact (the ridge that the c-clip installs into is not broken), then a new set of bearings can be installed, and the assembly can be reused.<br/><br/>Alternatively, a new bearing assembly can be installed.<br/><br/><br/>56.245S/C | Rupes Eccentric Bearing Stack Assembly.<br/>Install Tips for Rupes Replacement Parts 560.197/C and 56.245S/C.<br/><br/>Thoroughly clean the interior of the hub. Apply a liberal amount of oil into the hub, and along the circumference of the bearing assembly.<br/><br/><br/>56.245S/C | Rupes Eccentric Bearing Stack Assembly.<br/>Install Tips for Rupes Replacement Parts 560.197/C and 56.245S/C.<br/><br/>Place the bearing assembly into the hub. Make sure that the assembly is aligned squarely, and is not off-kilter.<br/><br/><br/>56.245S/C | Rupes Eccentric Bearing Stack Assembly.<br/>Install Tips for Rupes Replacement Parts 560.197/C and 56.245S/C.<br/><br/>To press the bearing into the hub, use an appropriately sized socket, one that makes contact with the outer edge of the bearing assembly, but has enough internal clearance to allow the spindle to fit inside the socket.<br/><br/><br/>56.245S/C | Rupes Eccentric Bearing Stack Assembly.<br/>Install Tips for Rupes Replacement Parts 560.197/C and 56.245S/C.<br/><br/>If no bench vice is available, an appropriately-sized socket can be used to support the hub, which will be set onto sturdy surface (such as a work table, or a cement floor).<br/><br/><br/>56.245S/C | Rupes Eccentric Bearing Stack Assembly.<br/>Install Tips for Rupes Replacement Parts 560.197/C and 56.245S/C.<br/><br/>If the sockets are to be placed between the jaws of a vice, the sockets will need to be relatively short. If the sockets will be used to hammer the bearing assembly into the hub, then socket height is unimportant.<br/><br/><br/>56.245S/C | Rupes Eccentric Bearing Stack Assembly.<br/>Install Tips for Rupes Replacement Parts 560.197/C and 56.245S/C.<br/><br/>Masking tape can be used to keep the hub and socket in alignment.<br/><br/><br/>56.245S/C | Rupes Eccentric Bearing Stack Assembly.<br/>Install Tips for Rupes Replacement Parts 560.197/C and 56.245S/C.<br/><br/>Install the new Bearing & Spindle Assembly.<br/> Keep in mind that the shape hubs vary: whereas one hub may feature a perfectly level backside, others may be very uneven.<br/><br/><br/>56.245S/C | Rupes Eccentric Bearing Stack Assembly.<br/>Install Tips for Rupes Replacement Parts 560.197/C and 56.245S/C.<br/><br/>Install the new Bearing & Spindle Assembly.<br/> When tapping or pressing the bearing assembly into the hub, use extreme caution to ensure that the bearing assembly slides into the hub straight & true (not crooked, or off-kilter). If the assembly does happen to be positioned off-kilter and becomes stuck must be removed, it can be pulled from the front, or carefully tapped out from the rear. <br/><br/> To remove the assembly from the FRONT: Clamp the hub into a bench vice, spindle facing up. If a vice is not available, clamp adjustable or locking pliers onto the circumference of the hub. If the pliers utilize teeth or grooves, some cosmetic damage is likely to occur to the hub. <br/><br/> Install an M8-1.25 bolt into the spindle. Clamp locking pliers onto the head of the bolt. Heat the hub, then apply oil into the gap where the bearing enters the hub. Firmly grasp the pliers, and wrangle the assembly loose. <br/><br/> If the assembly is stuck, tap the side of the pliers with a hammer to help loosen it. If the bolt accepts a hex wrench (as does the factory supplied backing plate bolt), the wrench can be used instead of pliers.<br/><br/><br/>56.245S/C | Rupes Eccentric Bearing Stack Assembly.<br/>Install Tips for Rupes Replacement Parts 560.197/C and 56.245S/C.<br/><br/>Install the new Bearing & Spindle Assembly.<br/> Option 1: Press the new bearing assembly into a heated & oiled hub by tapping the bearing assembly into the hub.  <br/><br/> Keep in mind that the shape of hubs vary. Whereas one hub may feature a perfectly level backside, another may be uneven. Masking tape can help to shore up the variance. <br/><br/> Warming the hub with a heat gun or blow dryer will minutely expand the hub, which will help the bearing assembly slide into place. Apply oil to the perimeter of the bearing. <br/><br/> Place the top socket atop the bearing assembly, and tap it with a hammer until the bearing is flush with the top of the hub.<br/><br/><br/>56.245S/C | Rupes Eccentric Bearing Stack Assembly.<br/>Install Tips for Rupes Replacement Parts 560.197/C and 56.245S/C.<br/><br/>Install the new Bearing & Spindle Assembly.<br/>The bearing assembly, properly installed.<br/><br/><br/>56.245S/C | Rupes Eccentric Bearing Stack Assembly.<br/>Install Tips for Rupes Replacement Parts 560.197/C and 56.245S/C.<br/><br/>Install the new Bearing & Spindle Assembly.<br/>  Option 2: Press the new bearing assembly into a heated & oiled hub by placing the bearing assembly into a vice. Slowly close the jaws until the bearing assembly has been fully installed.  <br/><br/> In this case, the hub has a protruding, off-center piece of metal (the threaded hole where the hub mounts to the machine). Extreme caution was used to ensure that the bearing assembly pressed into the hub straight & true. <br/><br/> As mentioned previously, a short socket can add support to the backside of the hub. <br/><br/> Warming the hub with a heat gun or blow dryer will minutely expand the hub, which will help the bearing assembly slide into place. Apply oil to the perimeter of the bearing. Pay close attention while closing the jaws to ensure that the bearing assembly is sliding in properly, not off-kilter.<br/><br/><br/>56.245S/C | Rupes Eccentric Bearing Stack Assembly.<br/>Install Tips for Rupes Replacement Parts 560.197/C and 56.245S/C.<br/><br/>Install the new Bearing & Spindle Assembly.<br/>  Option 2: Press the new bearing assembly into a heated & oiled hub by placing the bearing assembly into a vice. Slowly close the jaws until the bearing assembly has been fully installed.  <br/><br/> In this case, the hub has a protruding, off-center piece of metal (the threaded hole where the hub mounts to the machine). Extreme caution was used to ensure that the bearing assembly pressed into the hub straight & true. <br/><br/> As mentioned previously, a short socket can add support to the backside of the hub. Warming the hub with a heat gun or blow dryer will minutely expand the hub, which will help the bearing assembly more easily slide into place.<br/><br/><br/>56.245S/C | Rupes Eccentric Bearing Stack Assembly.<br/>Install Tips for Rupes Replacement Parts 560.197/C and 56.245S/C.<br/><br/>Install the new Bearing & Spindle Assembly.<br/> Continue pressing the bearing assembly into place until the bearing is positioned flush with the face of the hub.<br/><br/><br/>56.245S/C | Rupes Eccentric Bearing Stack Assembly.<br/>Install Tips for Rupes Replacement Parts 560.197/C and 56.245S/C.<br/><br/>Install the new Bearing & Spindle Assembly.<br/> Once the bearing assembly is sitting flush with the hub face, refrain from pressing further: although the assembly has enough room to slide in an additional millimeter or two, there is no benefit, the spindle may bottom out, causing it to bind.<br/><br/><br/>56.245S/C | Rupes Eccentric Bearing Stack Assembly.<br/>Install Tips for Rupes Replacement Parts 560.197/C and 56.245S/C.<br/><br/>Install the new Bearing & Spindle Assembly.<br/> Apply threadlocker to the holes or screws, set the counterweight atop the hub, install the screws, and tighten.<br/><br/><br/>56.245S/C | Rupes Eccentric Bearing Stack Assembly.<br/>Install Tips for Rupes Replacement Parts 560.197/C and 56.245S/C.<br/><br/>Install the new Bearing & Spindle Assembly.<br/> Apply threadlocker to the holes or screws, set the counterweight atop the hub, install the screws, and tighten.<br/><br/><br/>56.245S/C | Rupes Eccentric Bearing Stack Assembly.<br/>Install Tips for Rupes Replacement Parts 560.197/C and 56.245S/C.<br/><br/>A completed assembly.<br/><br/>
Click to enlarge image(s)


Replacement Parts: Bearing & Spindle Assembly.

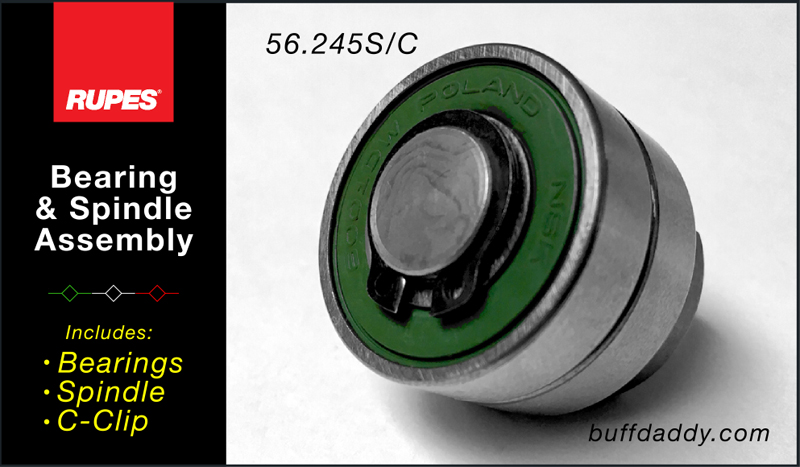
The Rupes® 56.245S/C Bearing & Spindle Assembly is a 4-piece unit that includes a pair of bearings, a backing plate mounting spindle, and a c-clip.

This assembly is best installed by the Rupes Factory-Direct Repair Center (link), a machine shop, or a mechanic. That being said, is not impossible to replace the assembly using some very basic tools.

Typical tools needed to remove & replace the assembly include a Philips screwdriver, a heat gun, tool oil, bearing puller, a dowel punch & hammer, channel locks, a bench vise, and sockets that match the diameter of the bearing assembly (and a size larger). View the images, and read the corresponding comments for advice on how to replace the assembly.

This assembly fits the following machines:
LHR15ES | LHR15ll | LHR15lll
LHR21ES | LHR21ll | LHR21lll | LHR12E

Quantity Price
1 - 1
$30.00
2+
$28.00