D.I.Y. Headlight Restoration Kit


D.I.Y. Headlight Restoration Kit

D.I.Y. Headlight Restoration Kit

D.I.Y. Headlight Restoration Kit
16-Piece D.I.Y. Headlight Kit.<br/><br/>INSTRUCTIONS.There are (4) steps to refinishing headlight lenses.<br/><br/>1. Use an abrasive sanding disc to eliminate lens degradation.<br/>This kit contains 3 grades of Mirka Autonet Sanding Discs.<br/><br/>2. Use an abrasive finishing disc to refine or eliminate harsh sanding marks.<br/>This kit contains 2 grades Mirka Abralon Foam Backed Finishing Discs.<br/><br/>3. Use a buffing pad and liquid to restore clarity to the lens.<br/>This kit contains 2 buffing pads (wool & foam), and one bottle of buffing liquid.<br/><br/>4. Apply a layer of durable protection.<br/>This kit contains an aerosol can of Meguiar's Keep Clear Headlight Coating.<br/><br/>About Sanding & Finishing Discs.<br/>Use both types of disc moistened with water. There are two types of sanding disc included in your kit. For best results, use both in conjunction with spritzes of water, applied via trigger bottle. Frequently rinse the disc to ensure a clean & rapid cut (you can safely rinse the disc while it is mounted onto the hand pad or backing plate).<br/><br/>Note that during sanding, you will typically see a white slurry form atop the headlight lens; this is ground-away remnants of the UV inhibitor, and oxidized plastic, emulsified into water. Unless it becomes tacky or visually dry, the slurry is nothing to be concerned about. As sanding progresses through the finer grades, expect to see less slurry.<br/><br/>Autonet Discs | For Sanding.<br/>These are the thinner, screen-style discs. In this kit, they are referred to as sanding discs, because they are designed to quickly eliminate lens degradation and oxidation. Since they are rigid and coarser than the other discs, they can easily cut through and abrade away the affected area. Autonet Discs are supplied in two grades of coarseness (the lower the number, the coarser the disc).<br/><br/>Two of these four grades are included in your kit: P320 | P400 | P600 | P800<br/><br/>These discs should be used with the supplied Mirka 9133 Velcro Foam Interface Pad. The interface pad will enable the disc to readily conform to curved or contoured surfaces. Further, its Velcro hooks are designed to work specifically with these discs, ensuring that the hooks do not protrude through the net material. The interface pad also protects the backing plate’s Velcro hooks, so they are not damaged during sanding.<br/><br/>Abralon Discs | For Refining.<br/>These discs are thicker than the Autonet Discs. They feature a red foam interlayer, and a much softer, supple sanding face. In this kit, they are referred to as finishing or refining discs, because they are less capable of slicing through oxidation and degradation (they are non-rigid). Instead, they abrade the surface by riding atop the sanding surface, eventually wearing down irregularities, without introducing deep sanding marks. These discs can be used with any version of interface pad. Since these discs utilize a built in foam material, it is not necessary to use an interface pad, unless the surface being sanded is aggressively contoured.<br/><br/>Two grades of disc are included in your kit: P1000 | P3000<br/><br/>Identifying the coarseness of discs.<br/>Sanding & finishing discs are graded using an internationally recognized measuring chart that identifies the abrasive grain size used to make the sanding portion of the disc. The purpose is to help gauge the coarseness and characteristics of the disc. However, since one design of disc might feature super-smooth & refined abrasive grains that are positioned tightly together, and another design of disc might feature a jagged abrasive grain that has been distributed haphazardly... this chart is best utilized when comparing discs within the same design. Knowing this, we can utilize this grading scale to help estimate the potential cut rate of the included Autonet and Abralon Discs.<br/><br/>Autonet P320: 46 micron<br/>Autonet P400: 35 micron<br/>Autonet P600: 26 micron<br/>Autonet P800: 22 micron<br/><br/>Abralon P1000: 18 micron<br/>Abralon P2000: 10 micron<br/>Abralon P3000: 7 micron<br/>Abralon P4000: 6 micron<br/><br/>By referring to the chart, we can deduce that an attempt to remove the sanding marks created by a P320 grade disc using a P400 disc should be very time-effective. However, attempting to remove the same P320 grade sanding marks using a P800 grade disc would require substantially more time versus using the P400 grade disc.<br/><br/>"How long should I sand?"<br/>In the case of restoring clarity to plastic headlight lenses, the goal of the initial sanding step is to eliminate lens degradation, flaking or yellowing of the UV layer, or dullness of the lens. Therefore, sanding must continue until a satisfactory result is achieved. Once this is accomplished, it can be difficult to gauge just exactly how much sanding is required to eliminate the sanding marks left by the first round of sanding. <br/><br/>In order to precisely determine how much sanding is required to eliminate sanding marks created during a previous sanding step (while sanding is being accomplished), it is best to utilize a timed approach, versus gauging sanding effectiveness by feel, or via visual inspection.<br/><br/>It is important to note that although visually inspecting a sanded surface can be extremely effective, it is only effective when the sanded surface is free of debris, water, or slurry. Since these discs perform best when used in conjunction with water (and the water mixes with the sanding debris to form a pudding-like slurry), using a timed approach should deliver the best result while sanding is being accomplished. Otherwise, wiping the lens clean prior to visually inspecting it is a viable option.<br/><br/>Regardless, timed sanding tends to be more precise than sanding by feel, because as sanding begins, the sanding disc slides across the peaks of the previous sanding marks (which are sharp, pointy, and grabby). As the peaks of the sanding marks are worn away, the disc more easily slides across the progressively smoother and flatter surface. Consequently, the feel of the sanding action changes from grippy to gliding, giving the impression that the surface has been sufficiently leveled. Oftentimes though, this is a false impression, and upon further refining of the surface via sanding or polishing, deep sanding marks become visually apparent.<br/><br/>HEADLIGHT RESTORATION.<br/><br/>Step 1: Eliminate lens degradation via Autonet Sanding Discs.<br/>About Autonet Discs: These are the thinner, screen-style discs. They are supplied in two grades of coarseness (the lower the number, the coarser the disc). Two of these four grades are included in your kit: P320 | P400 | P600 | P800 It is not necessary to start with the coarsest disc. Rather, it would be wise to start with the P800 grade disc. The P800 sanding disc will typically remove quite a bit of material, and it is often the coarsest grade needed.<br/><br/>Hand versus machine application.<br/>In most cases, sanding by hand is very time-efficient, and easy to accomplish. If machine sanding is preferred, the kit offers an optional drill mountable shaft & Velcro backing plate.<br/><br/>To determine sanding efficiency:<br/>Test-sand a small section of the lens. To test, work on a small section of the headlight. If an abundance of white slurry is being generated via sanding, it is an indication of an efficient and rapid cut. At some point (judgement call) stop sanding, wipe the lens dry, and inspect. If the lens does not appear yellow (or is only minimally yellow), and there are no obvious blemishes, proceed to the next step. Otherwise, if it appears that lens surface is improving but debris removal is taking too long, step down to a coarser grade of disc to accomplish the initial sanding. Once the first step of sanding is complete, move on to the next sanding step.<br/><br/>Step 2: Eliminate harsh sanding scratches via Abralon Foam Backed Discs.<br/>Once you have finished with the P800 grade of disc, install the P1000 Abralon Foam Backed Finishing Disc. This disc features a red foam interlayer, and a much softer & supple sanding face. The same sort of sanding rules apply with this disc: bump speed up until the disc glides along smoothly, and gauge sanding sufficiency by timing the sanding step. After thoroughly sanding the lens, clean and dry the lens. Visually inspect it to ensure that there are no random scratches, scuffs, or obvious blemishes. If any unsightly areas are apparent, rework the area by using an appropriate grade of disc, or discs. Once this step is finished, the supplied buffing compound and pads can usually eliminate any remaining sanding marks in this grit range. However, to ensure a pristine result, it is best to further refine using the P3000 disc.<br/><br/>Step 3: Restore clarity to the lens via polishing. Once sanding has been completed, utilize the wool pad and buffing liquid to restore clarity to the lens. To machine polish via handheld drill:<br/>Secure the shaft into the drill chuck. Install the yellow Velcro backing plate onto the shaft, and tighten. Install the wool pad onto the Velcro backing plate. To prepare the wool pad for use, prime the pad by applying buffing liquid directly onto the wool, and massage it in. Next, add a pea-sized drop of buffing liquid to the face of the pad, set the pad against the lens, and throttle the drill ON to begin polishing.<br/><br/>To dial in the optimal drill speed, bump speed UP until the pad glides along smoothly. As the buffing pad and liquid accumulate polishing debris, you can expect the motor speed to bog down a bit. A slight upward adjustment to the drill's motor speed may be required to keep the pad gliding along smoothly. While polishing, it is almost always better to use MORE buffing liquid rather than LESS, as the buffing liquid remains more lotion-like, and capable.<br/><br/>Once lens clarity is apparent, OR if the pad becomes difficult to control, stop polishing. Wipe the lens clean using a cotton or microfiber towel. Clean the buffing pad using compressed air (as delivered by an air compressor), or by wiping the pad clean with a cotton or microfiber towel. Otherwise, increasing the quantity of buffing liquid can effectively clean the pad as long as polishing is halted while an abundance of buffing liquid remains on the lens. Once the residue has been wiped from the lens, apply more buffing liquid, and continue polishing. Note: Do not polish until the buffing liquid has been completely eliminated from the headlight lens. Instead, it is best to wipe the excess liquid away while there is still a small quantity remaining on the lens. Once the sanding marks have been eliminated:<br/>Switch to the foam pad to finalize polishing of the lens. This step should not take very long, and once again, adjust drill speed as recommended throughout this instruction sheet.<br/><br/>Step 4: Apply a layer of durable protection.<br/>Upon the completion of polishing, wipe the area clean. Prepare the lens for the application of Meguiar's Aerosol Headlight Coating by wiping the headlight lens with hot water, isopropyl alcohol (diluted 50/50 with water), or glass cleaner. Dry the lens using a paper towel, or a cloth towel that has not been treated with fabric softener. Mask or cover any areas of the vehicle that may be susceptible to overspray (accidental application of the coating). The headlight coating aerosol can is outfitted with a high quality spray nozzle, ensuring a very precise spray pattern. Begin coating by spraying the outer perimeter of the headlight lens, then spray the entire lens, using a pattern that overlaps the previous spray stroke by 50%. Do not apply excessively, as the coating may sag, or run. Wait 5-10 minutes, and reapply. The headlight coating dries rapidly, and is usually dry to the touch within 15-20 minutes... but do not touch it! Keep moisture away from freshly coated lenses for a minimum three hours. Typically, the coating fully cures within 24 hours.<br/><br/>Once fully cured, inspect the lens.<br/>Should any blemishes exist in the coating (usually due to accidental contact with the lens during curing), hand polishing may minimize or eliminate the blemish. Install the yellow foam buffing pad onto the supplied hand applicator pad. Prime the pad using the included buffing liquid. Apply additional buffing liquid to the pad, and polish using smooth & repeated passes until the blemish is minimized, or eliminated.<br/><br/>End.<br/>AE-203-320 • Mirka 3" P320 Autonet Mesh Fabric Sanding Disc.<br/><br/>Close-up of Autonet Disc.<br/>Mirka 3" Autonet Mesh Fabric Sanding Disc.<br/><br/>AE-203-400 • Mirka 3" P400 Autonet Mesh Fabric Sanding Disc.<br/><br/>AE-203-400 • Mirka 3" P800 Autonet Mesh Fabric Sanding Disc.<br/><br/>8A-203-1000 • Mirka 3" P1000 Knitted Fabric Foam Disc Disc.<br/><br/>Close-up shot of Abralon.<br/><br/>Mirka 3" P1000 Knitted Fabric Foam Disc Disc.<br/><br/>P1000 Abralon Disc.<br/>8A-203-1000 • Mirka 3" P1000 Abralon Knitted Fabric Foam Disc.<br/><br/>P3000 Abralon Disc.<br/>8A-203-3000 • Mirka 3" P3000 Abralon Knitted Fabric Foam Disc.<br/><br/>3" Velcro Dome Hand Sanding Pad, with dimensions.<br/><br/>3" Velcro Dome Hand Sanding Pad, and Mirka 9133 3" Abranet Velcro Interface Pad face.<br/><br/>3" Velcro Dome Hand Sanding Pad, and Mirka 9133 3" Abranet Velcro Interface Pad face.<br/><br/>Add-on.<br/>3" Velcro Dome Hand Sanding Pad, and Rupes 3" Yellow Foam Polishing Pad.<br/><br/>Add-on.<br/>Use as a 1st step for severely damaged lenses.<br/><br/>Add-on.<br/>If hand sanding is physically taxing for you, sand using P600 between the P400 and P800 step.<br/><br/>Add-on.<br/><br/>Add-on.<br/><br/>Add-on.<br/><br/>Add-on.<br/><br/>Add-on.<br/>Tall Interface Pad if lenses are incredibly contoured, or you plan to use the sanding pad for other tasks.<br/><br/>Add-on.<br/>"Tall Interface Pad if lenses are incredibly contoured, or you plan to use the sanding pad for other tasks.<br/><br/>Add-on.<br/>Shaft Mount Mandrel installed into drill.<br/><br/>Add-on.<br/><br/><br/>Add-on.<br/><br/>
Click to enlarge image(s)


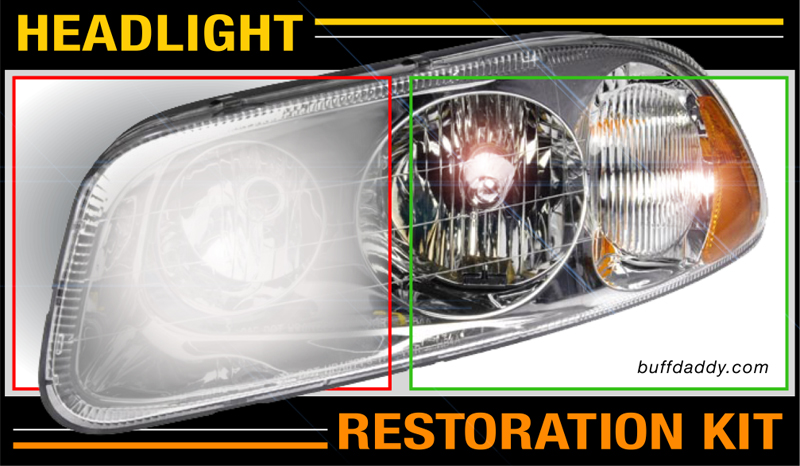
Do It Yourself Headlight Lens Restoration Kit.
Piecing together the items needed to restore clarity to plastic headlight lenses can be confusing. To simplify things, we've gathered up the components needed to restore that like-new appearance, and listed them here.

All sanding components attach via Velcro-style hooks & loops. Kit includes everything needed to restore headlights via hand application.

• (1) Dome-Style Sanding Pad (holds Velcro discs and pads)
• (1) Interface Pad (improves sanding disc flexibility)
• (4) Coarse Sanding Discs (removes heavy-duty damage)
• (4) Fine Sanding Discs (removes sanding marks & mild damage)
• (2) Super-fine Sanding Discs (removes fine sanding marks)
• (2) Ultra-fine Sanding Discs (prepares for final polishing)
• (1) Liquid Compound/Polish (restores clarity to lenses)
• (1) Aerosol Headlight Coating (seals & protects lenses)


Add a Cushiony Interface Pad.
If you plan to use the included Dome-Style Sanding Pad for tasks other than headlight lens restoration, consider adding a tall interface pad to your kit. This 3" diameter interface pad is approximately twice as tall as the included interface pad, and can be used to increase contourability of all Velcro-style sanding discs.

 Add a Yellow Foam Polishing Pad.
To restore clarity, by hand or machine.
Velcro-mount, 3" diameter. To restore clarity by hand or machine. Fits the Dome-Style Hand Pad perfectly. Incredibly versatile & popular. Should be a staple in your pad arsenal.


Add a Microfiber Cutting Pad.
For sanding mark removal, by hand or machine.
Velcro-mount, 3" diameter. For sanding mark removal by hand or machine. Features short-strand microfiber strings that deliver a rapid cut. A dense injection molded foam interlayer assists in delivering maximum machine motion to the microfiber material.


Add a Multi-Purpose Wool Buffing Pad.
All purpose pad removes defects & restores clarity, by machine.
Velcro-mount, 3" diameter. For sanding mark removal, and to restore clarity, by machine. Features dual-length strings that deliver a fast cut. A rigid blue foam interlayer assists in delivering a high rate of machine motion to the wool, while providing a cushiony and controlled feel during polishing.

 Add a Shaft-Mounted Backing Plate.
If you would rather restore headlight lenses using a handheld drill, this 3" diameter Shaft-Mounted Backing Plate enables attachment of interface Velcro-style pads and sanding discs. Mounts into chuck-style drills.